• Skip to main content
  • Skip to primary sidebar

Master Your Tech

Mobile phones, software, consumer electronic how-to guides

  • iPhone
  • Excel
  • Powerpoint
  • Word
  • Google Drive
  • Tech
  • Guides
You are here: Home / iPhone / How to Enable or Disable Background App Refresh on an iPhone 7

How to Enable or Disable Background App Refresh on an iPhone 7

posted on May 22, 2019

Your iPhone has a setting called Background App Refresh where apps that are running in the background will periodically check for new data. This is great if you want to make sure that your apps are always updated when you switch back to them, but it can also use data and battery life.

If you are looking for ways to extend your usage time on a battery charge, then this is a good setting to turn off. It may inconvenience you slightly as you will need to wait for the app to update when you open it, but it can give you a little extra usage time during the day.

How to Turn On or Turn Off Background App Refresh

The steps in this article were performed on an iPhone 7 Plus in iOS 12.2, but will also work on other iPhone models in most earlier versions of iOS as well.

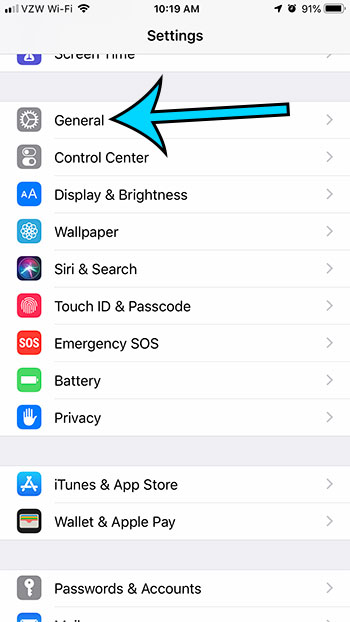
Step 1: Touch the Settings icon.

open iphone settings

Step 2: Choose the General option.

open the general menu

Step 3: Scroll down and select Background App Refresh.

choose background app refresh

Step 4: Tap the Background App Refresh button at the top of the screen.

how to enable or disable background app refresh on iphone 7

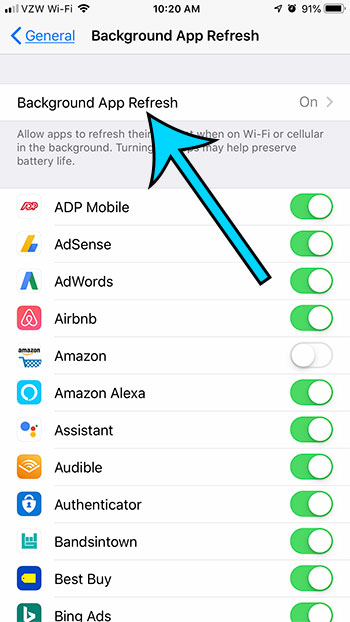
Step 5: Select the Off option to disable Background App Refresh, or choose one of the other options to modify how it occurs.

turn off background app refresh on iphone

Note that, in step 4 above, you have the option of individually controlling whether or not specific apps can update in the background, if you would prefer to keep this option enable for some or most of your apps.

Did you know that you can record a video of your iPhone screen? Find out about the screen recording option in the Control Center and see how you can add it to that menu and start using it to make recordings of what you see on your iPhone screen.

Matthew Burleigh
Matthew Burleigh

Matthew Burleigh has been a freelance writer since the early 2000s. You can find his writing all over the Web, where his content has collectively been read millions of times.

Matthew received his Master’s degree in Computer Science, then spent over a decade as an IT consultant for small businesses before focusing on writing and website creation.

The topics he covers for MasterYourTech.com include iPhones, Microsoft Office, and Google Apps.

You can read his full bio here.

Share this:

  • Click to share on X (Opens in new window) X
  • Click to share on Facebook (Opens in new window) Facebook

Related posts:

  • Firefox iPhone App: How to Enable or Disable Night Mode
  • How to Change the Background in iOS on iPhone 14: A Step-by-Step Guide
  • How to Enable or Disable Missed Call Notifications on an iPhone 11
  • How to Enable or Disable Camera Grid on iPhone 14: A Step-by-Step Guide
  • How to Enable or Disable Dictation on iPhone 13: A Step-by-Step Guide
  • How to Enable or Disable Grayscale on iPhone 13: A Step-by-Step Guide
  • How to Enable or Disable LED Flash for Alerts on iPhone 14: A Guide
  • iOS 17: How to Enable or Disable Camera Grid on iPhone
  • How to Enable or Disable Portrait Orientation Lock Button on iPhone 12
  • How to Enable or Disable Auto Rotation on Your iPhone 15
  • How to Remove Background Color from Cells in Google Sheets
  • How to Change the Background Color in Word 2013: A Step-by-Step Guide

Filed Under: iPhone

Search

Primary Sidebar

Latest Posts

  • How to Back Up Windows 11: Essential Steps for Data Security
  • How to Make a Windows Install USB: A Step-by-Step Guide
  • How to Get a Windows 11 Product Key: A Simple Guide
  • How to Change the Brightness on Windows 11: A Step-by-Step Guide
  • How to Upgrade Windows 7 to 10: A Step-by-Step Guide for 2023
  • Contact Us
  • Privacy Policy
  • Terms and Conditions

Copyright © 2026 MasterYourTech.com